

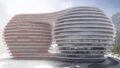
https://kkaa.co.jp/project/gc-prostho-museum-research-center/
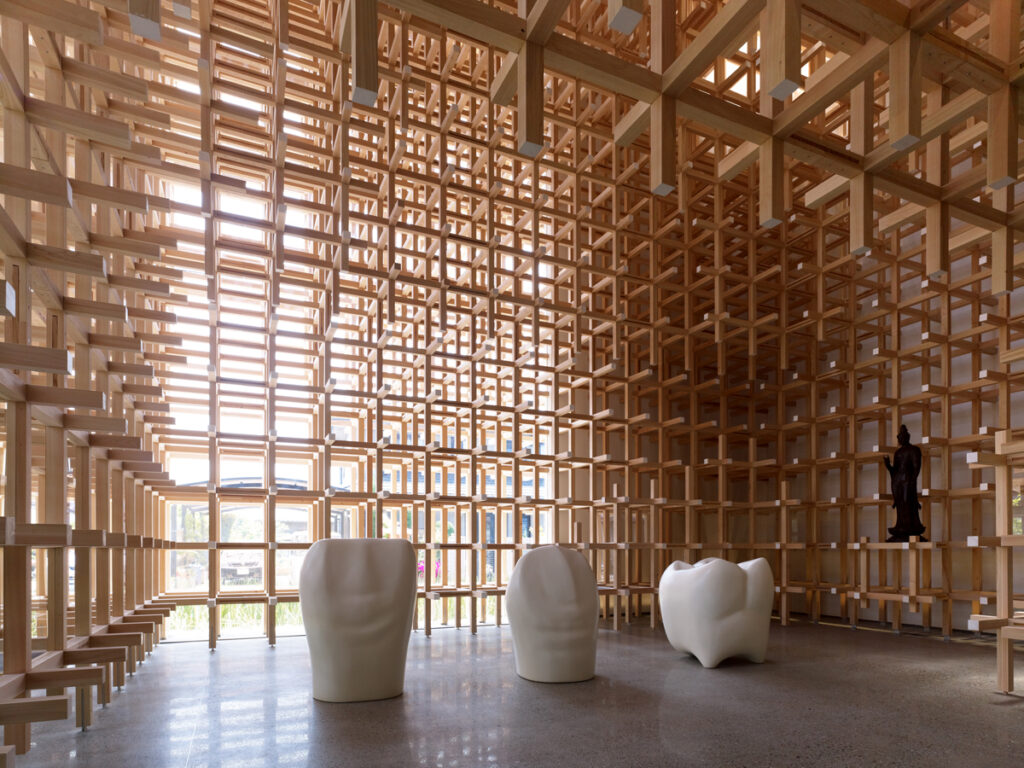
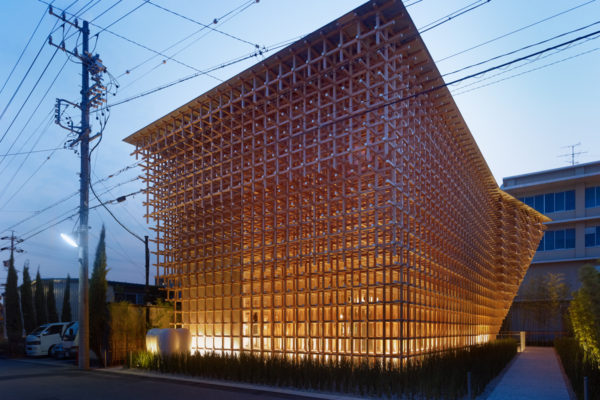
今回は、グラスホッパーで隈研吾建築のGCプロソミュージアム・リサーチセンターを再現しました。
動画で見る
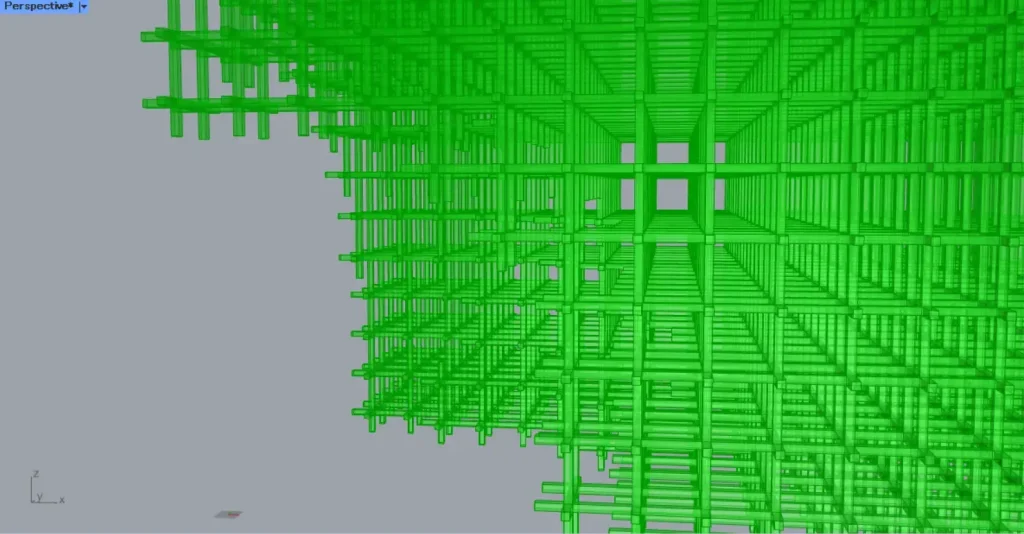
全体の様子

グラスホッパーの様子です。
ライノセラス上の様子です。
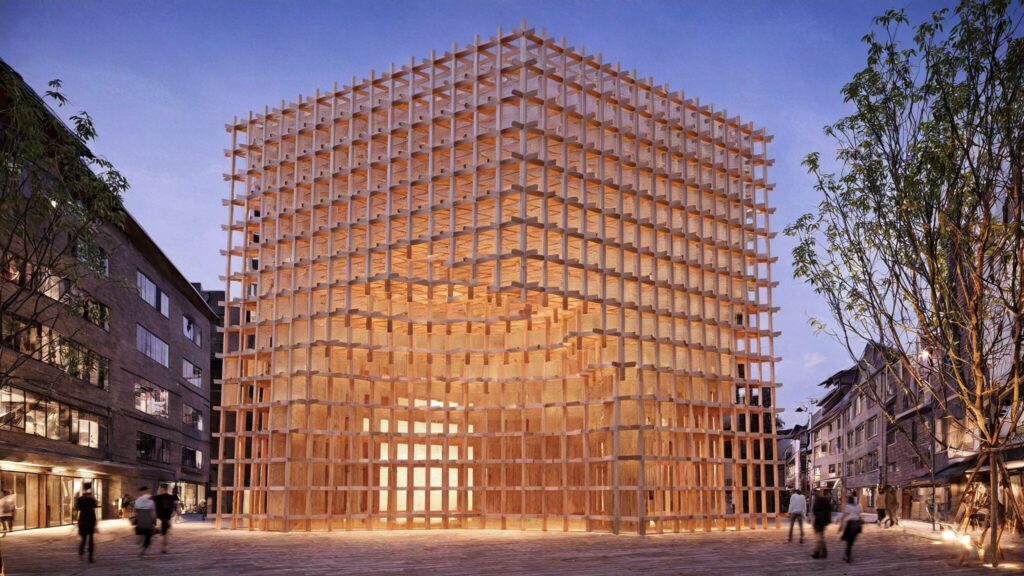
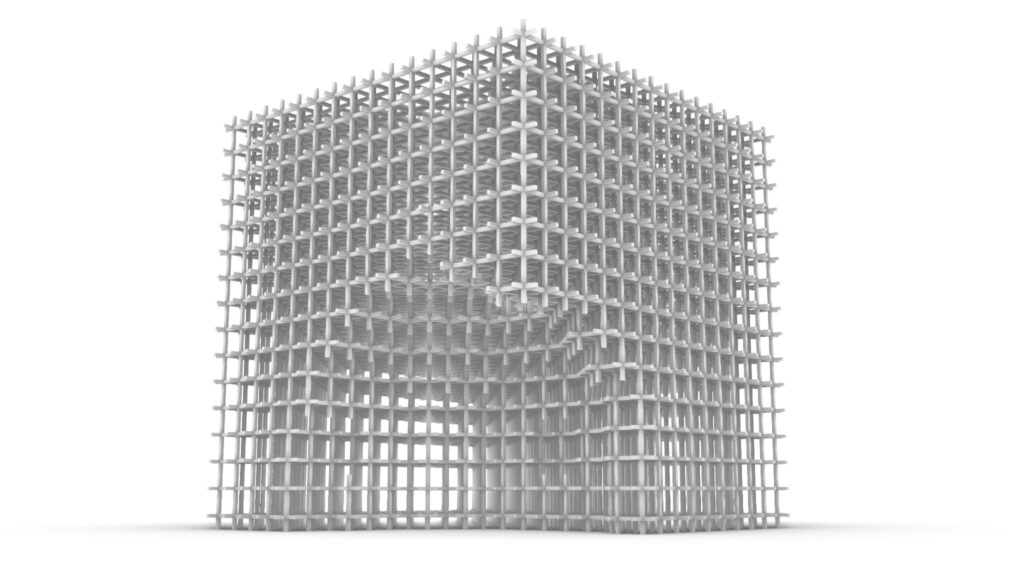
最終的にレンダリングした様子です。
それでは、順番に解説していきます。
今回使用したグラスホッパーとライノセラスのデータダウンロードはこちら
ダウンロードできるデータのご利用に関しては、利用規約をご覧ください。
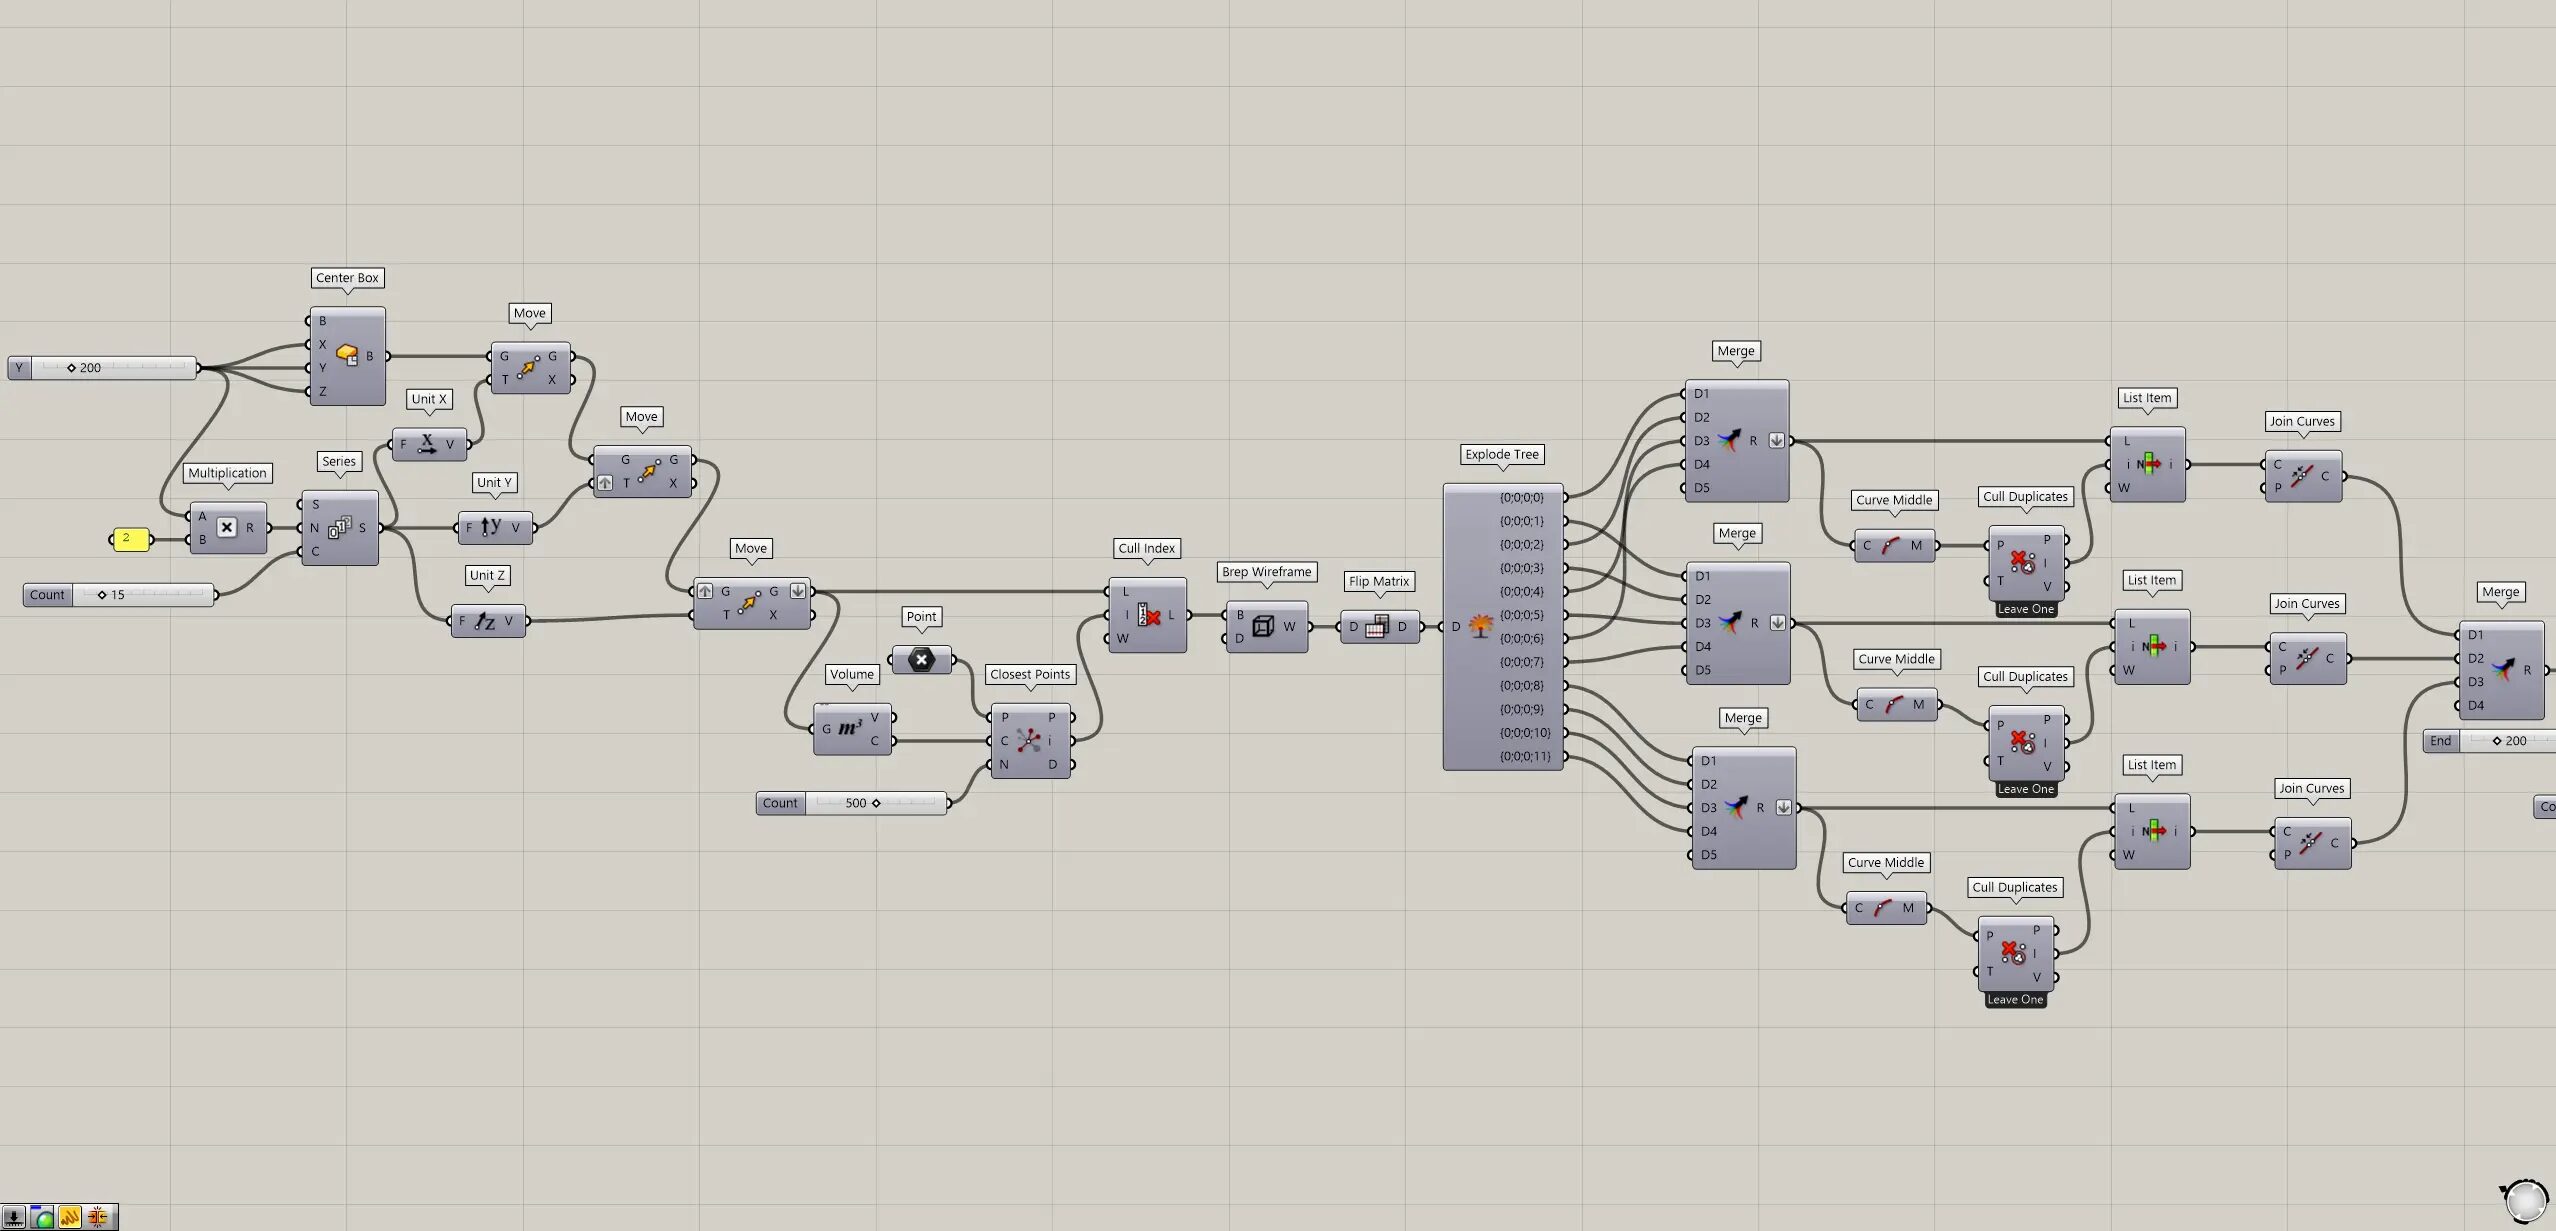
全体コンポーネント
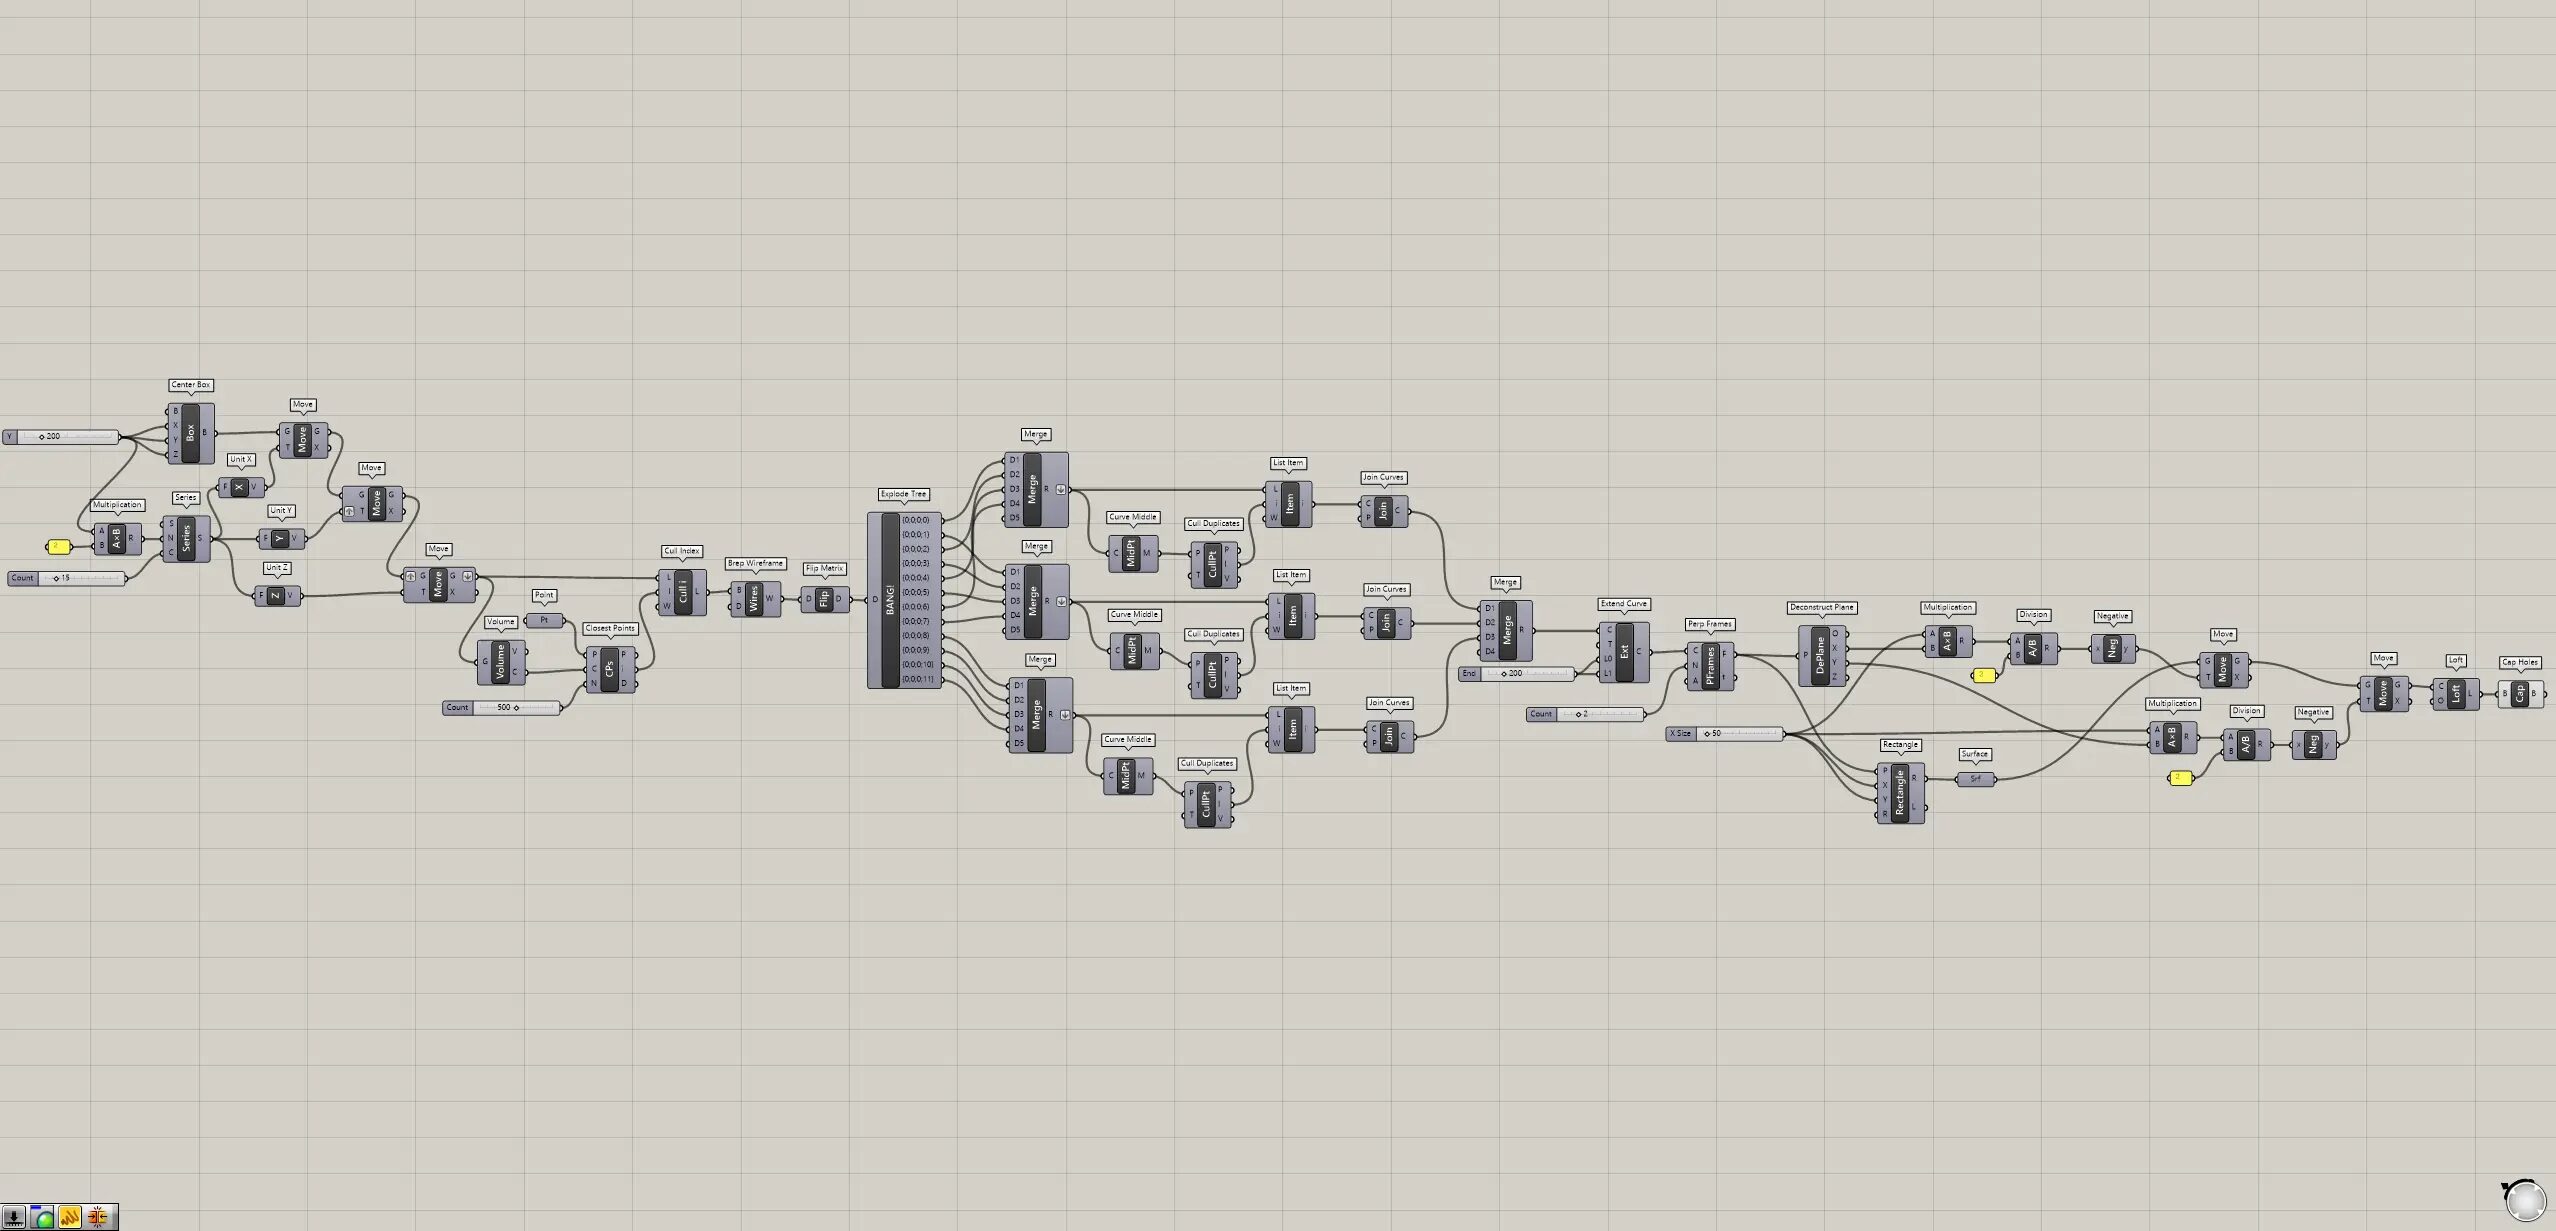

全体コンポーネント:①Center Box ②Multiplication ③Series ④Unit X ⑤Move ⑥Unit Y ⑦Unit Z ⑧Volume ⑨Point ⑩Closest Points ⑪Cull Index ⑫Brep Wireframe ⑬Flip Matrix ⑭Explode Tree ⑮Merge ⑯Curve Middle ⑰Cull Duplicates ⑱List Item ⑲Join Curves ⑳Extend Curve ㉑Perp Frames ㉒Deconstruct Plane ㉓Rectangle ㉔Surface ㉕Division ㉖Negative ㉗Loft ㉘Cap Holes

ボックスを積み上げる
最初に、ボックスを積み上げていきます。
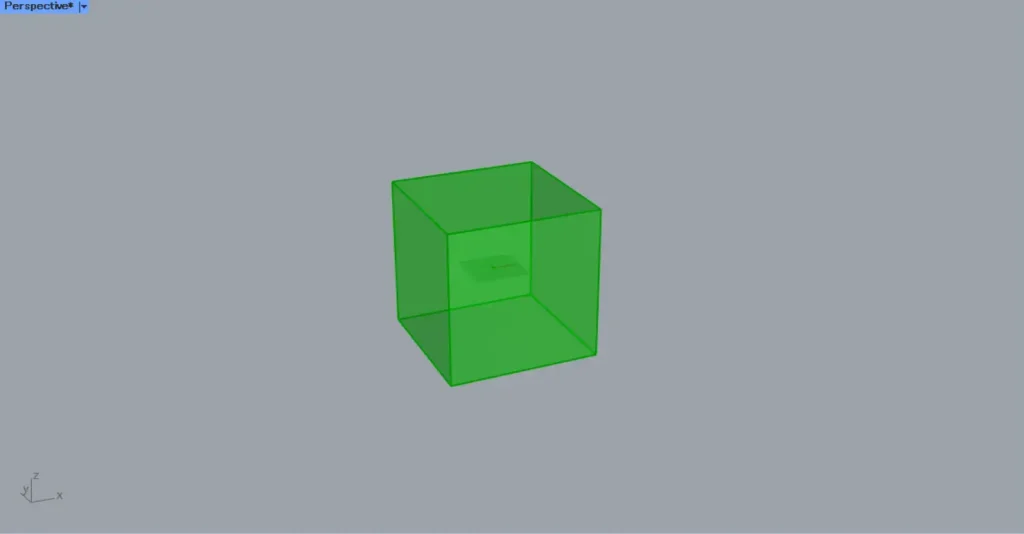
最初に、Center BoxのXとYとZ端子に、1辺の半分の長さの数値を入力します。
今回は、200を入力しています。
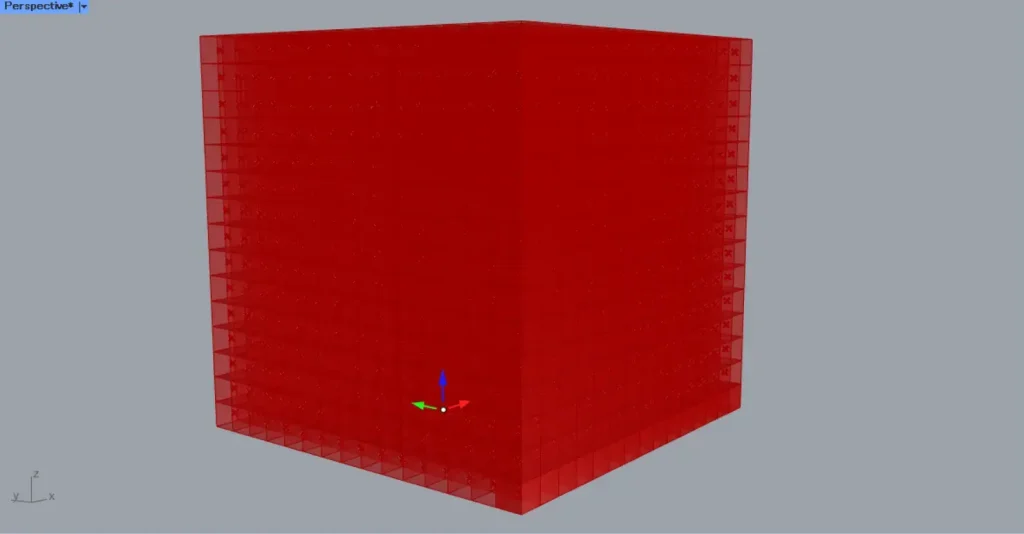
すると、400×400×400の立方体が作成されました。
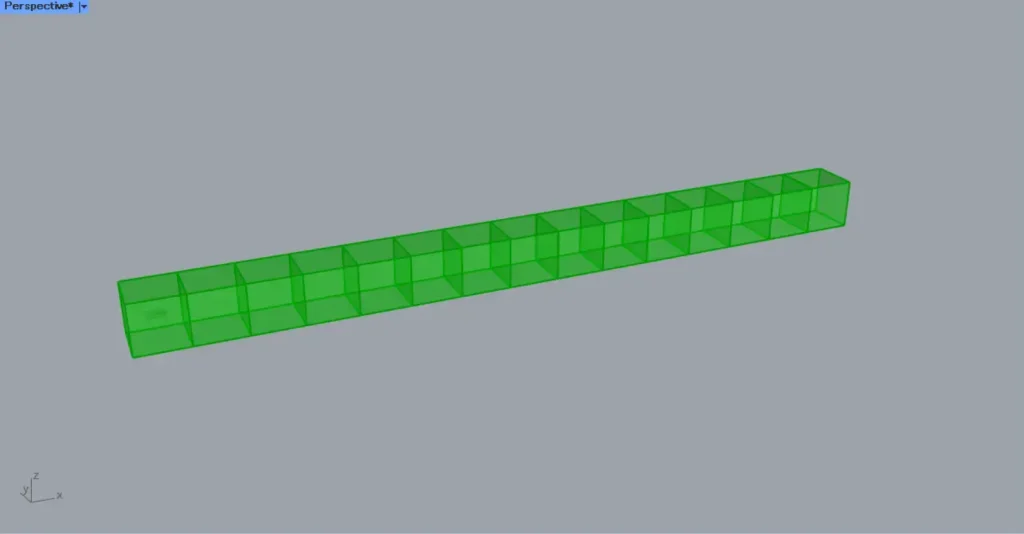
次に、ボックスをX方向に複数コピーします。
先程の200の数値を、MultiplicationのA端子につなげます。
また、MultiplicationのB端子に、2の数値を入力します。
すると、200×2=400の数値が出力されます。
その後、Multiplicationを、SeriesのN端子につなげます。
また、SeriesのC端子に、複数コピーする個数の数値を入力します。
今回は、15を入力しています。
すると、400ずつ増加する数値が、15個作成されました。
加えて、Center Boxを、MoveのG端子につなげます。
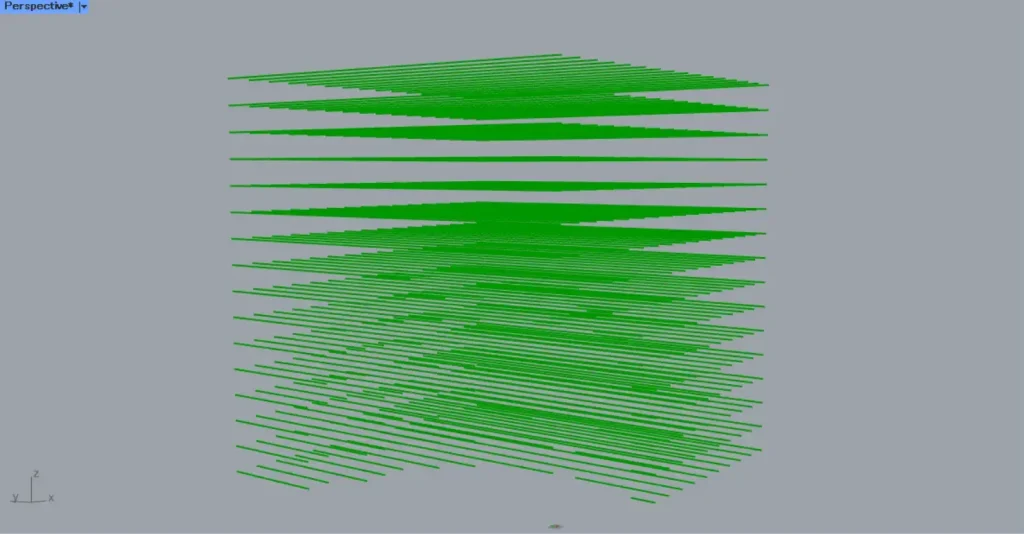
すると、上の画像のように、X軸方向にボックスが複数コピーされました。
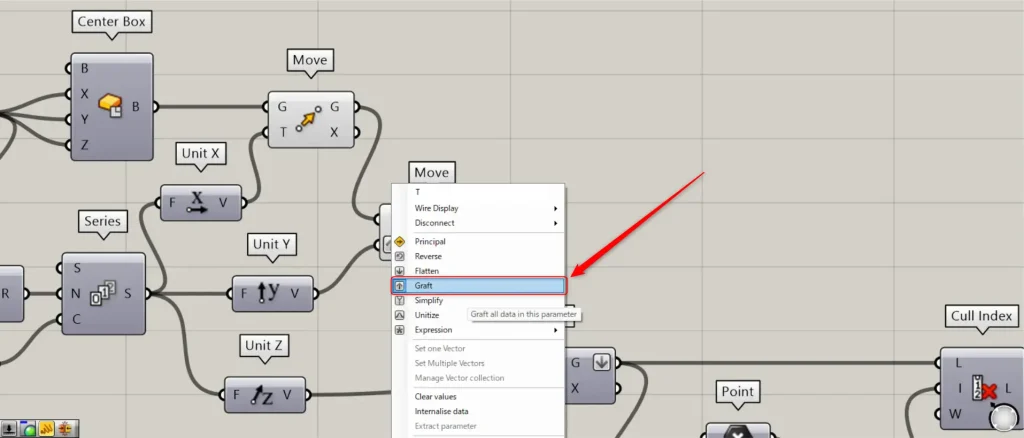
また、Y軸方向に複数コピーしていきます。
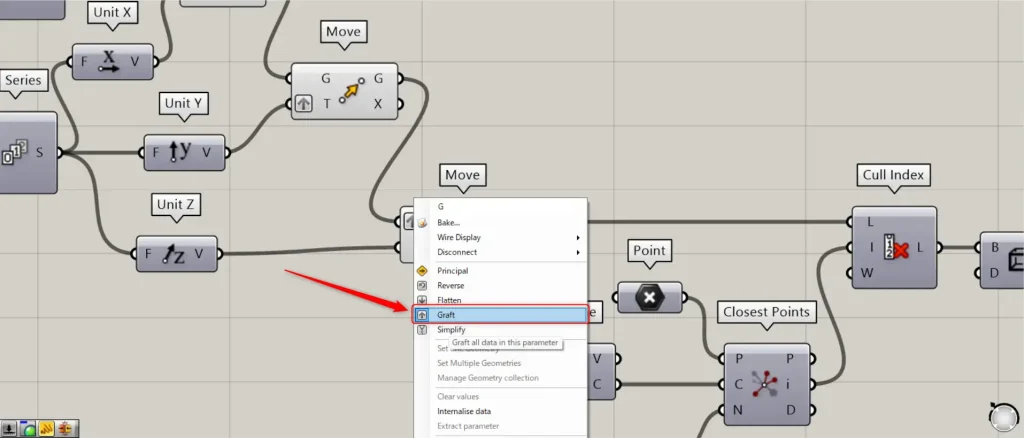
この際に、MoveのT端子を右クリックし、Graftを選択してください。
また、先程のMoveのG端子を、今回のMoveのG端子につなげます。
すると、Y軸方向に複数コピーされました。
さらに、Z軸方向にも複数コピーしていきます。
そして、先程のMoveのG端子を、今回のMoveのG端子につなげます。
この際に、Moveの左側のG端子を右クリックし、Graftを選択してください。
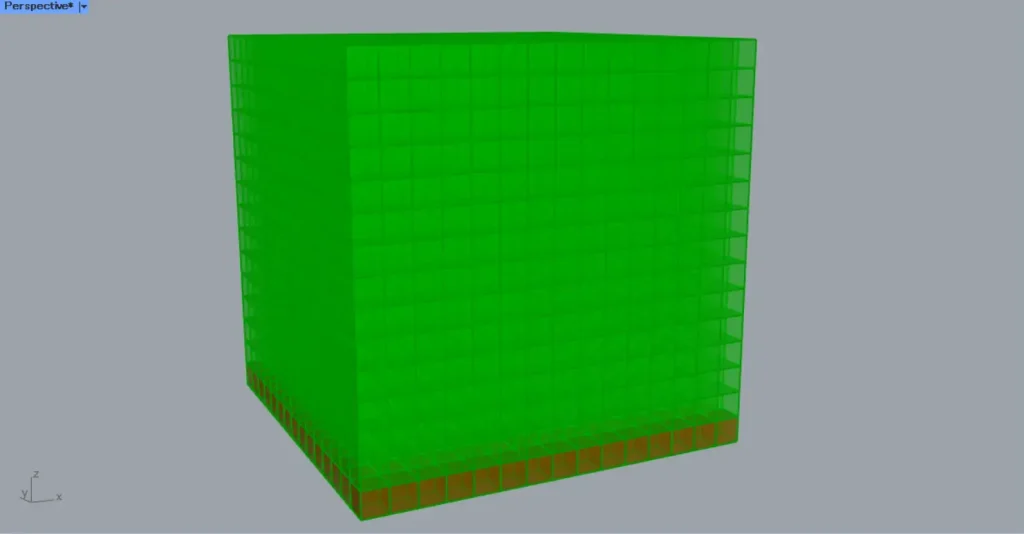
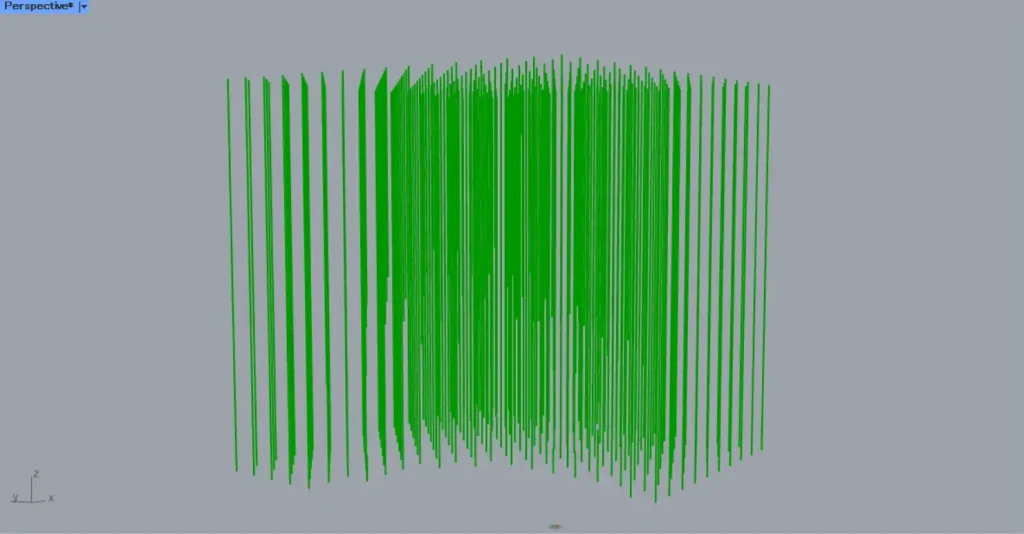
すると、Z軸方向にも複数コピーされました。
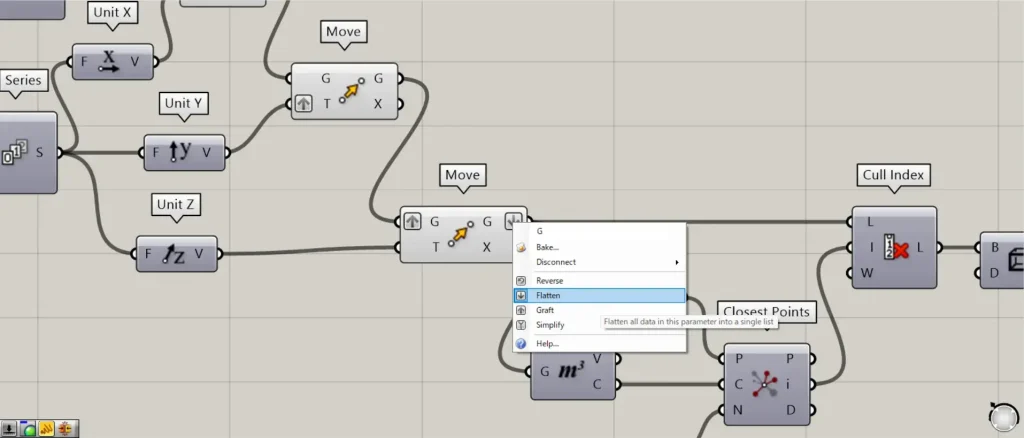
この際に、Moveの右側のG端子を右クリックし、Flattenを選択してください。
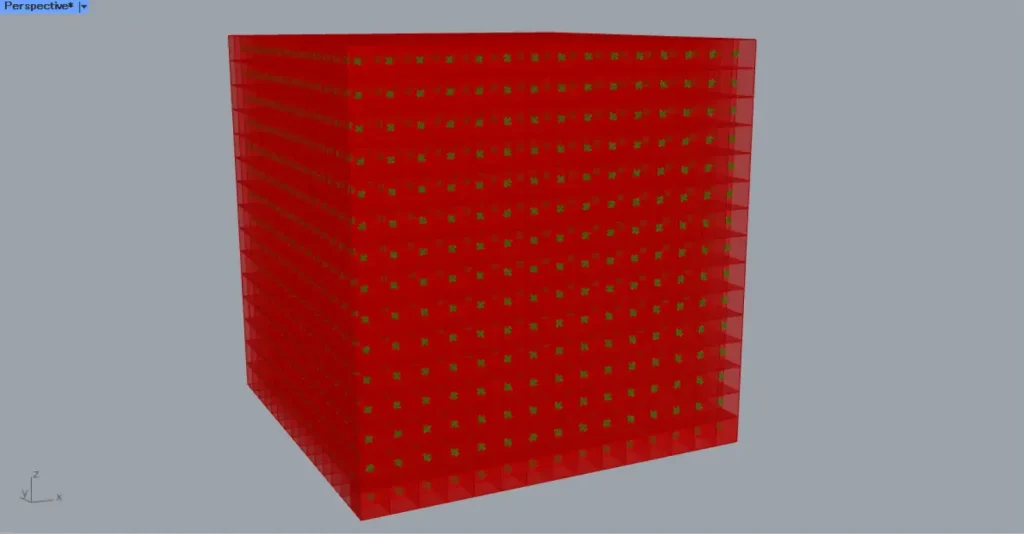
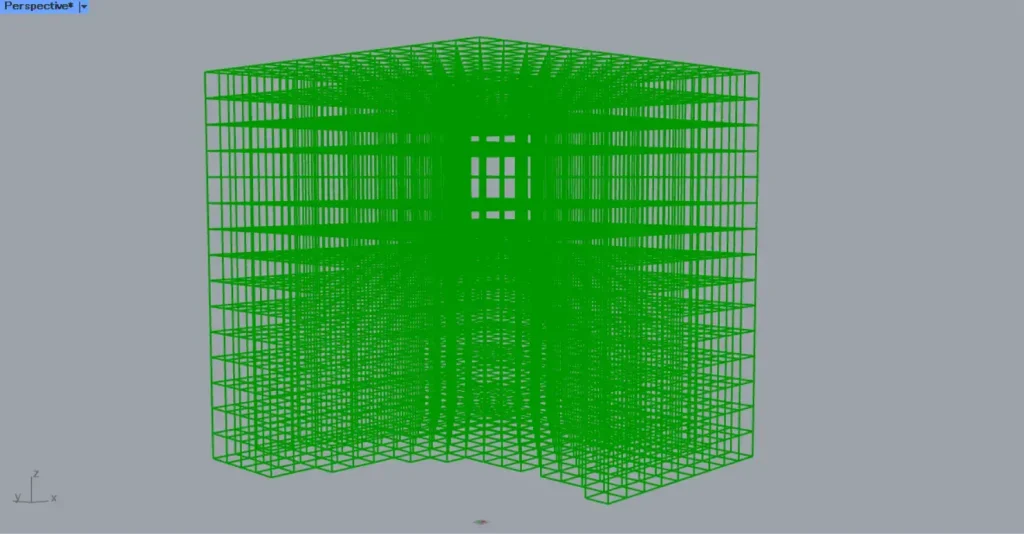
これで、ボックスを積み上げることができました。
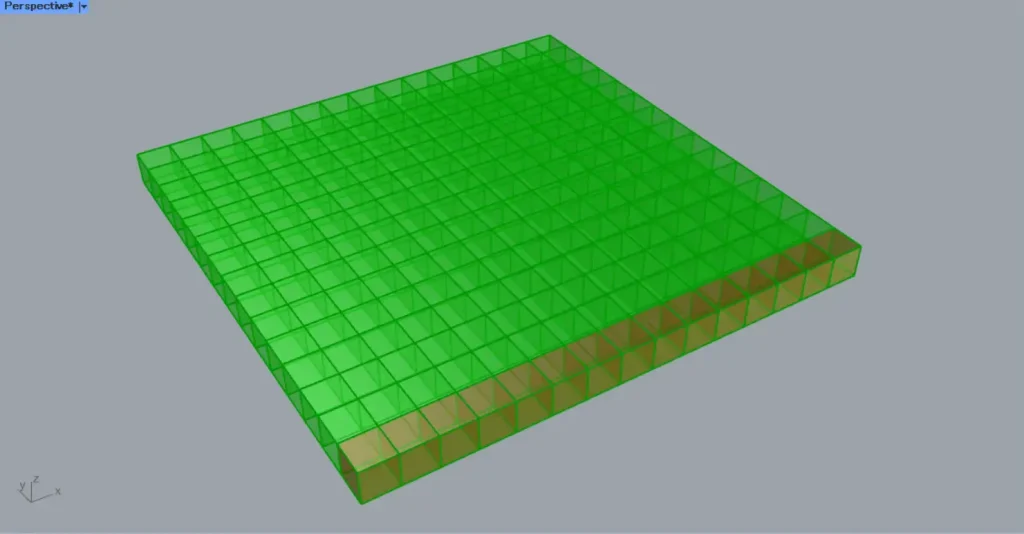
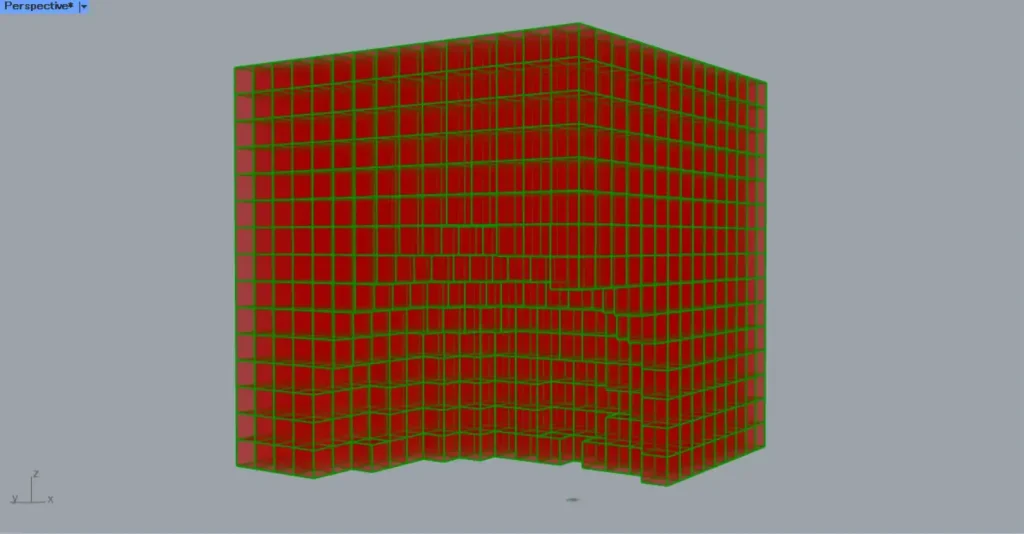
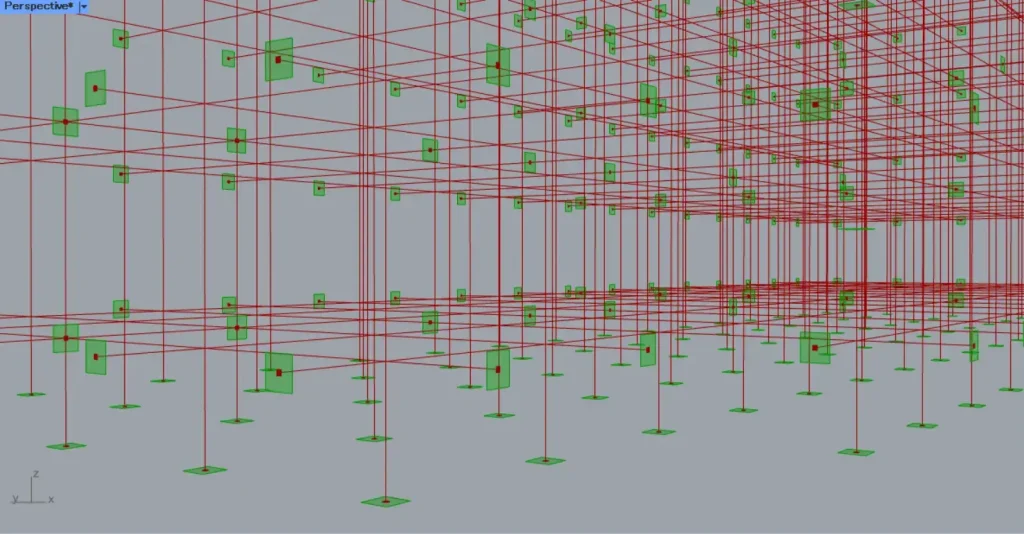
指定した点から近いボックスを取り除く
次に、指定した点から近いボックスを取り除きます。
すると、各ボックスの中心点を取得することができます。
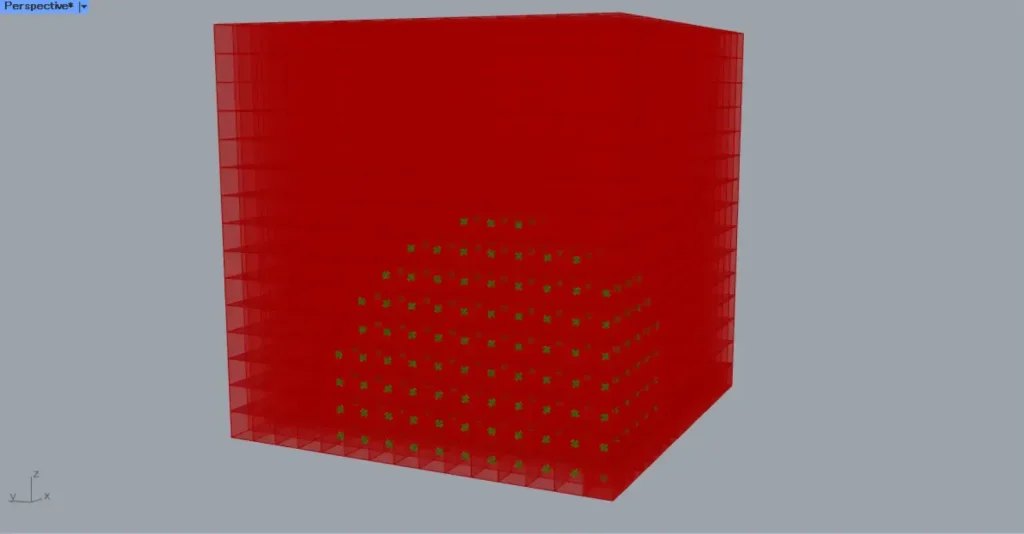
次に、ボックスを取り除きたい場所に、1つ点を作成します。
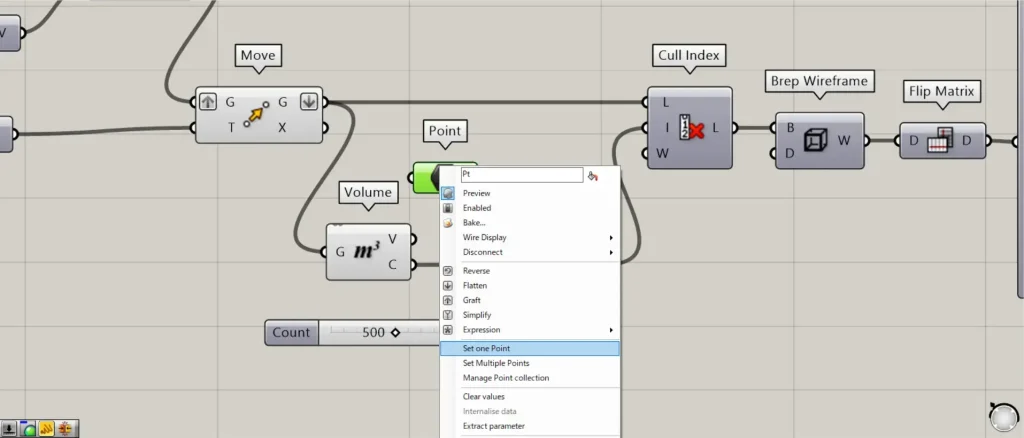
今回は、Pointを右クリックし、Set one Pointから点を作成しました。
その後、Pointを、Closest PointsのP端子につなげます。
また、VolumeのC端子を、Closest PointsのC端子につなげます。
そして、Closest PointsのN端子に、選択する点の個数の数値を入力します。
今回は、500を入力しています。
すると、上の画像のように、指定した点の近くのボックスの中心点が、いくつか選択されました。
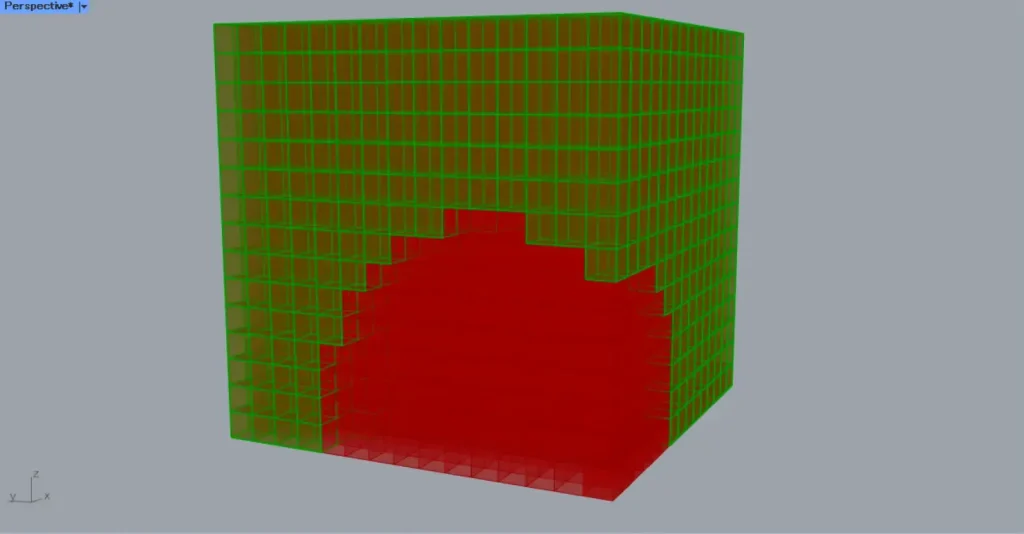
その後、Closest Pointsのi端子を、Cull IndexのI端子につなげます。
また、MoveのG端子を、Cull IndexのL端子につなげます。
すると、上の画像のように、取得した中心点を持つボックスを取り除くことができました。
その後、Cull Indexを、Brep WireframeのB端子につなげます。
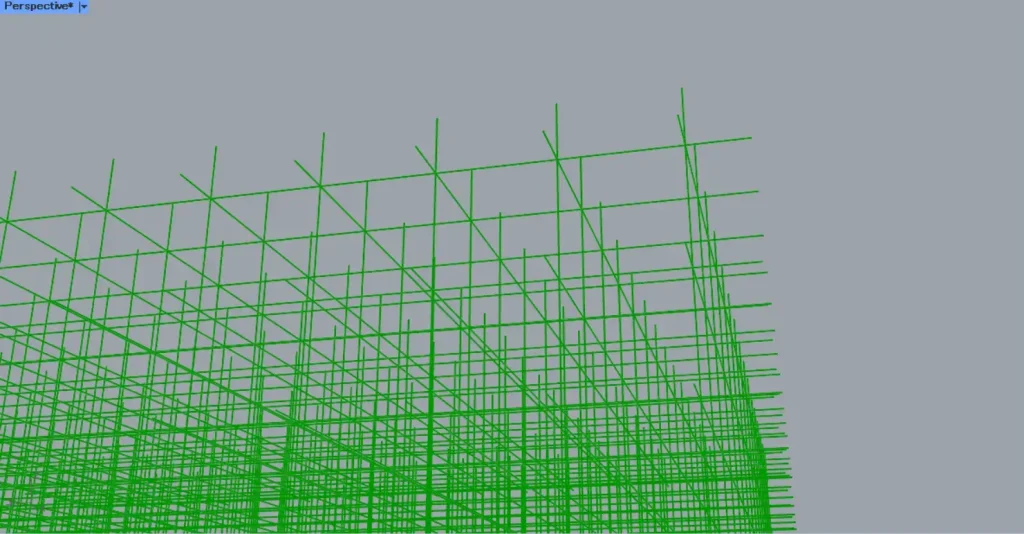
すると、各ボックスの枠線を取得することができました。
その後、Brep WireframeをFlip Matrixにつなげます。
これで、指定した点から近いボックスを取り除くことができました。
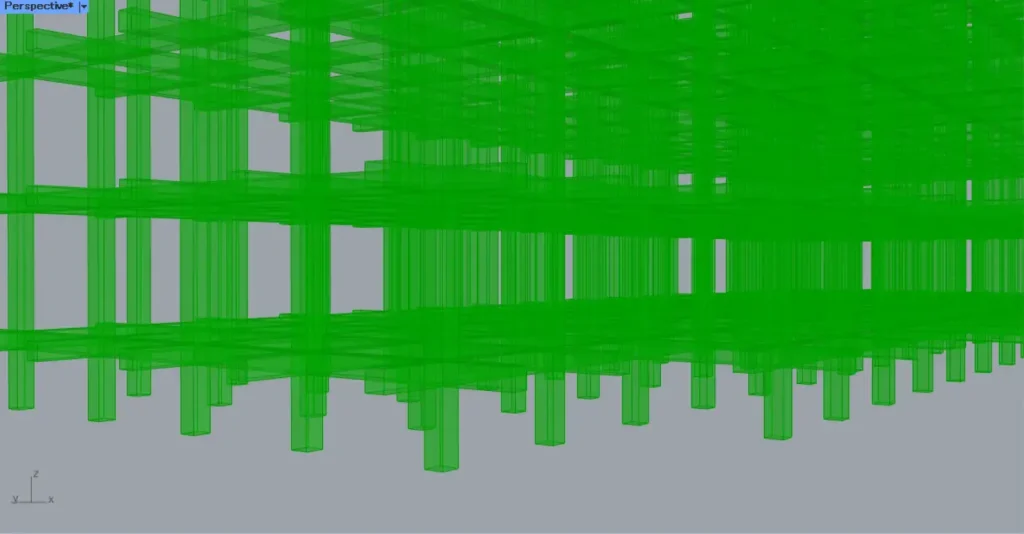
木材を作成する
次に、木材を作成していきます。
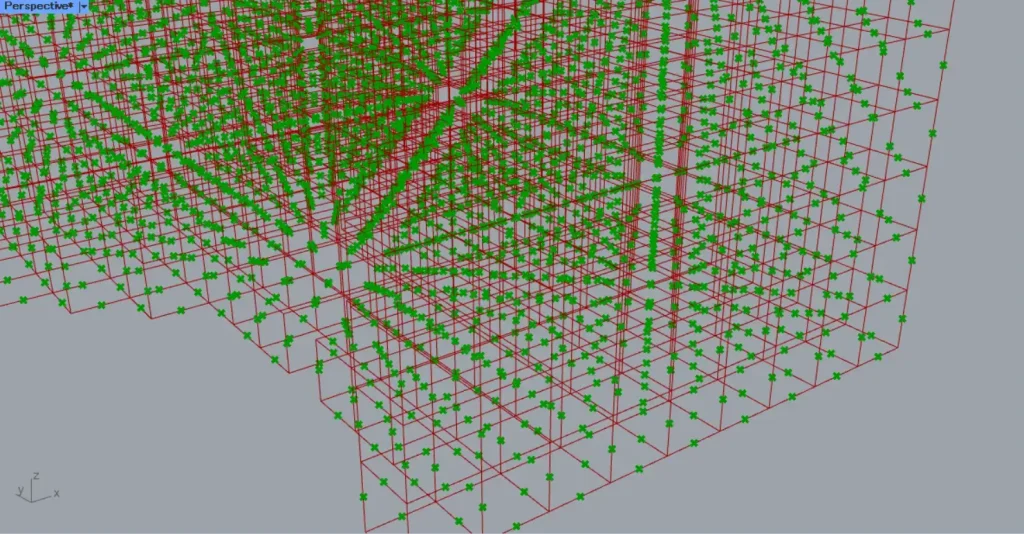
現状、ボックスの枠線が重複しているので、その部分を削除します。
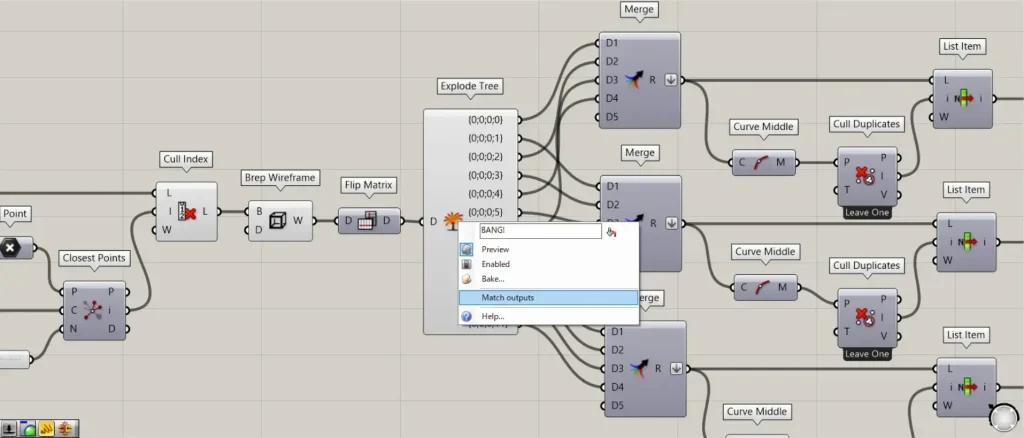
Flip Matrixを、Explode Treeにつなげます。
この際に、Explode Treeを右クリックし、Match outputsを選択してください。
すると、データの階層数と同じ数だけ、右側に端子が作成されます。
これにより、データの各階層のデータを取得することができるようになります。
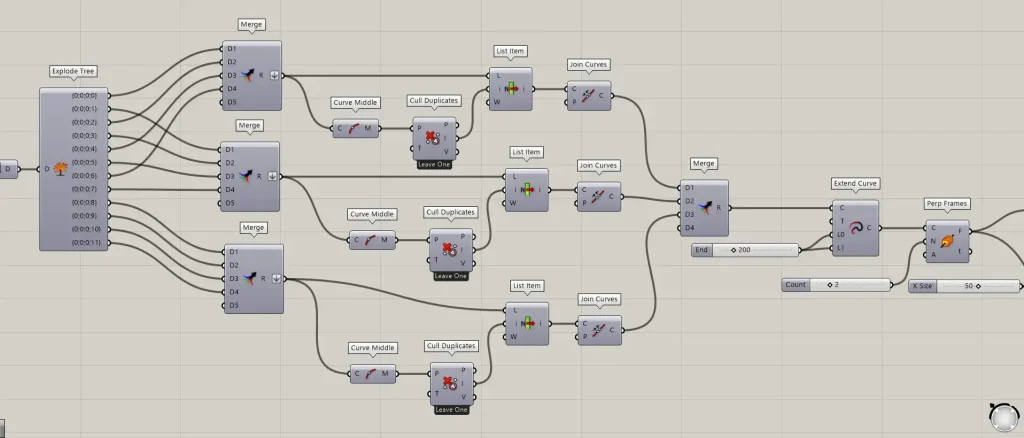
その後、Explode Treeの右側の端子を、上の画像のように3つのMergeにつなげます。
3つのMergeには、それぞれの方向の線がまとめられています。
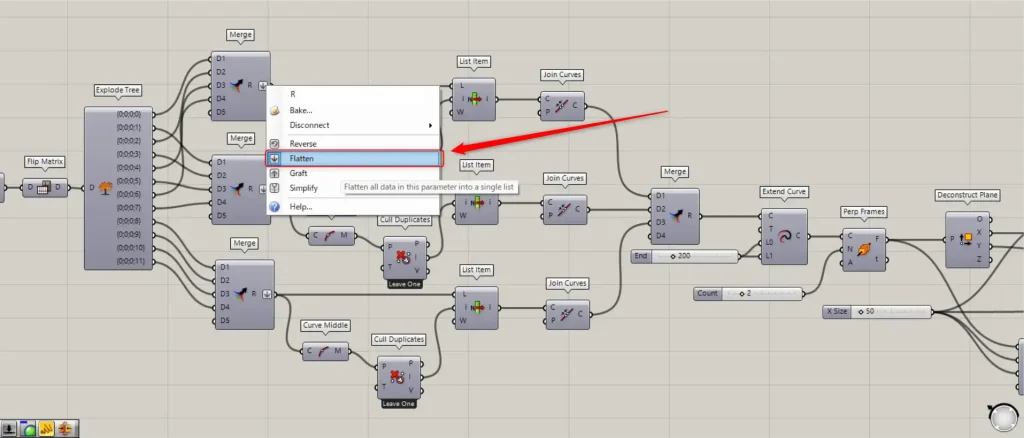
この際に、3つのMergeのR端子を右クリックし、Flattenを選択してください。
その後、Mergeを、Curve Middleにつなげます。
すると、各線の中心点を取得できます。
その後、Curve Middleを、Cull DuplicatesのP端子につなげます。
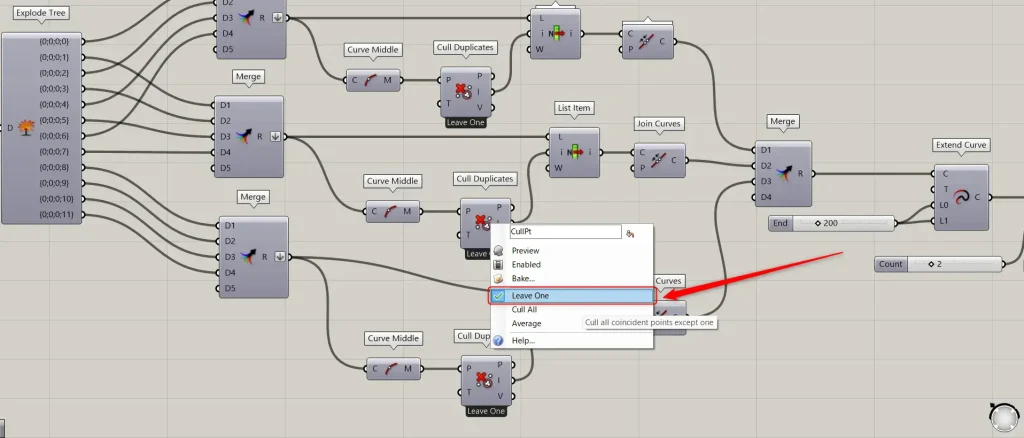
この際に、Cull Duplicatesを右クリックし、Leave Oneを選択してください。
すると、重複している点が、1つになるまで削除されました。
その後、Cull DuplicatesのI端子を、List Itemのi端子につなげます。
また、Mergeを、List ItemのL端子につなげます。
すると、重複しないで線を取得することができました。
そして、List Itemを、Join CurvesのC端子につなげます。
すると線を結合することができます。
この作業を、3つのMergeで行ってください。
そして、3つのJoin Curvesを、Mergeにつなげてまとめてください。

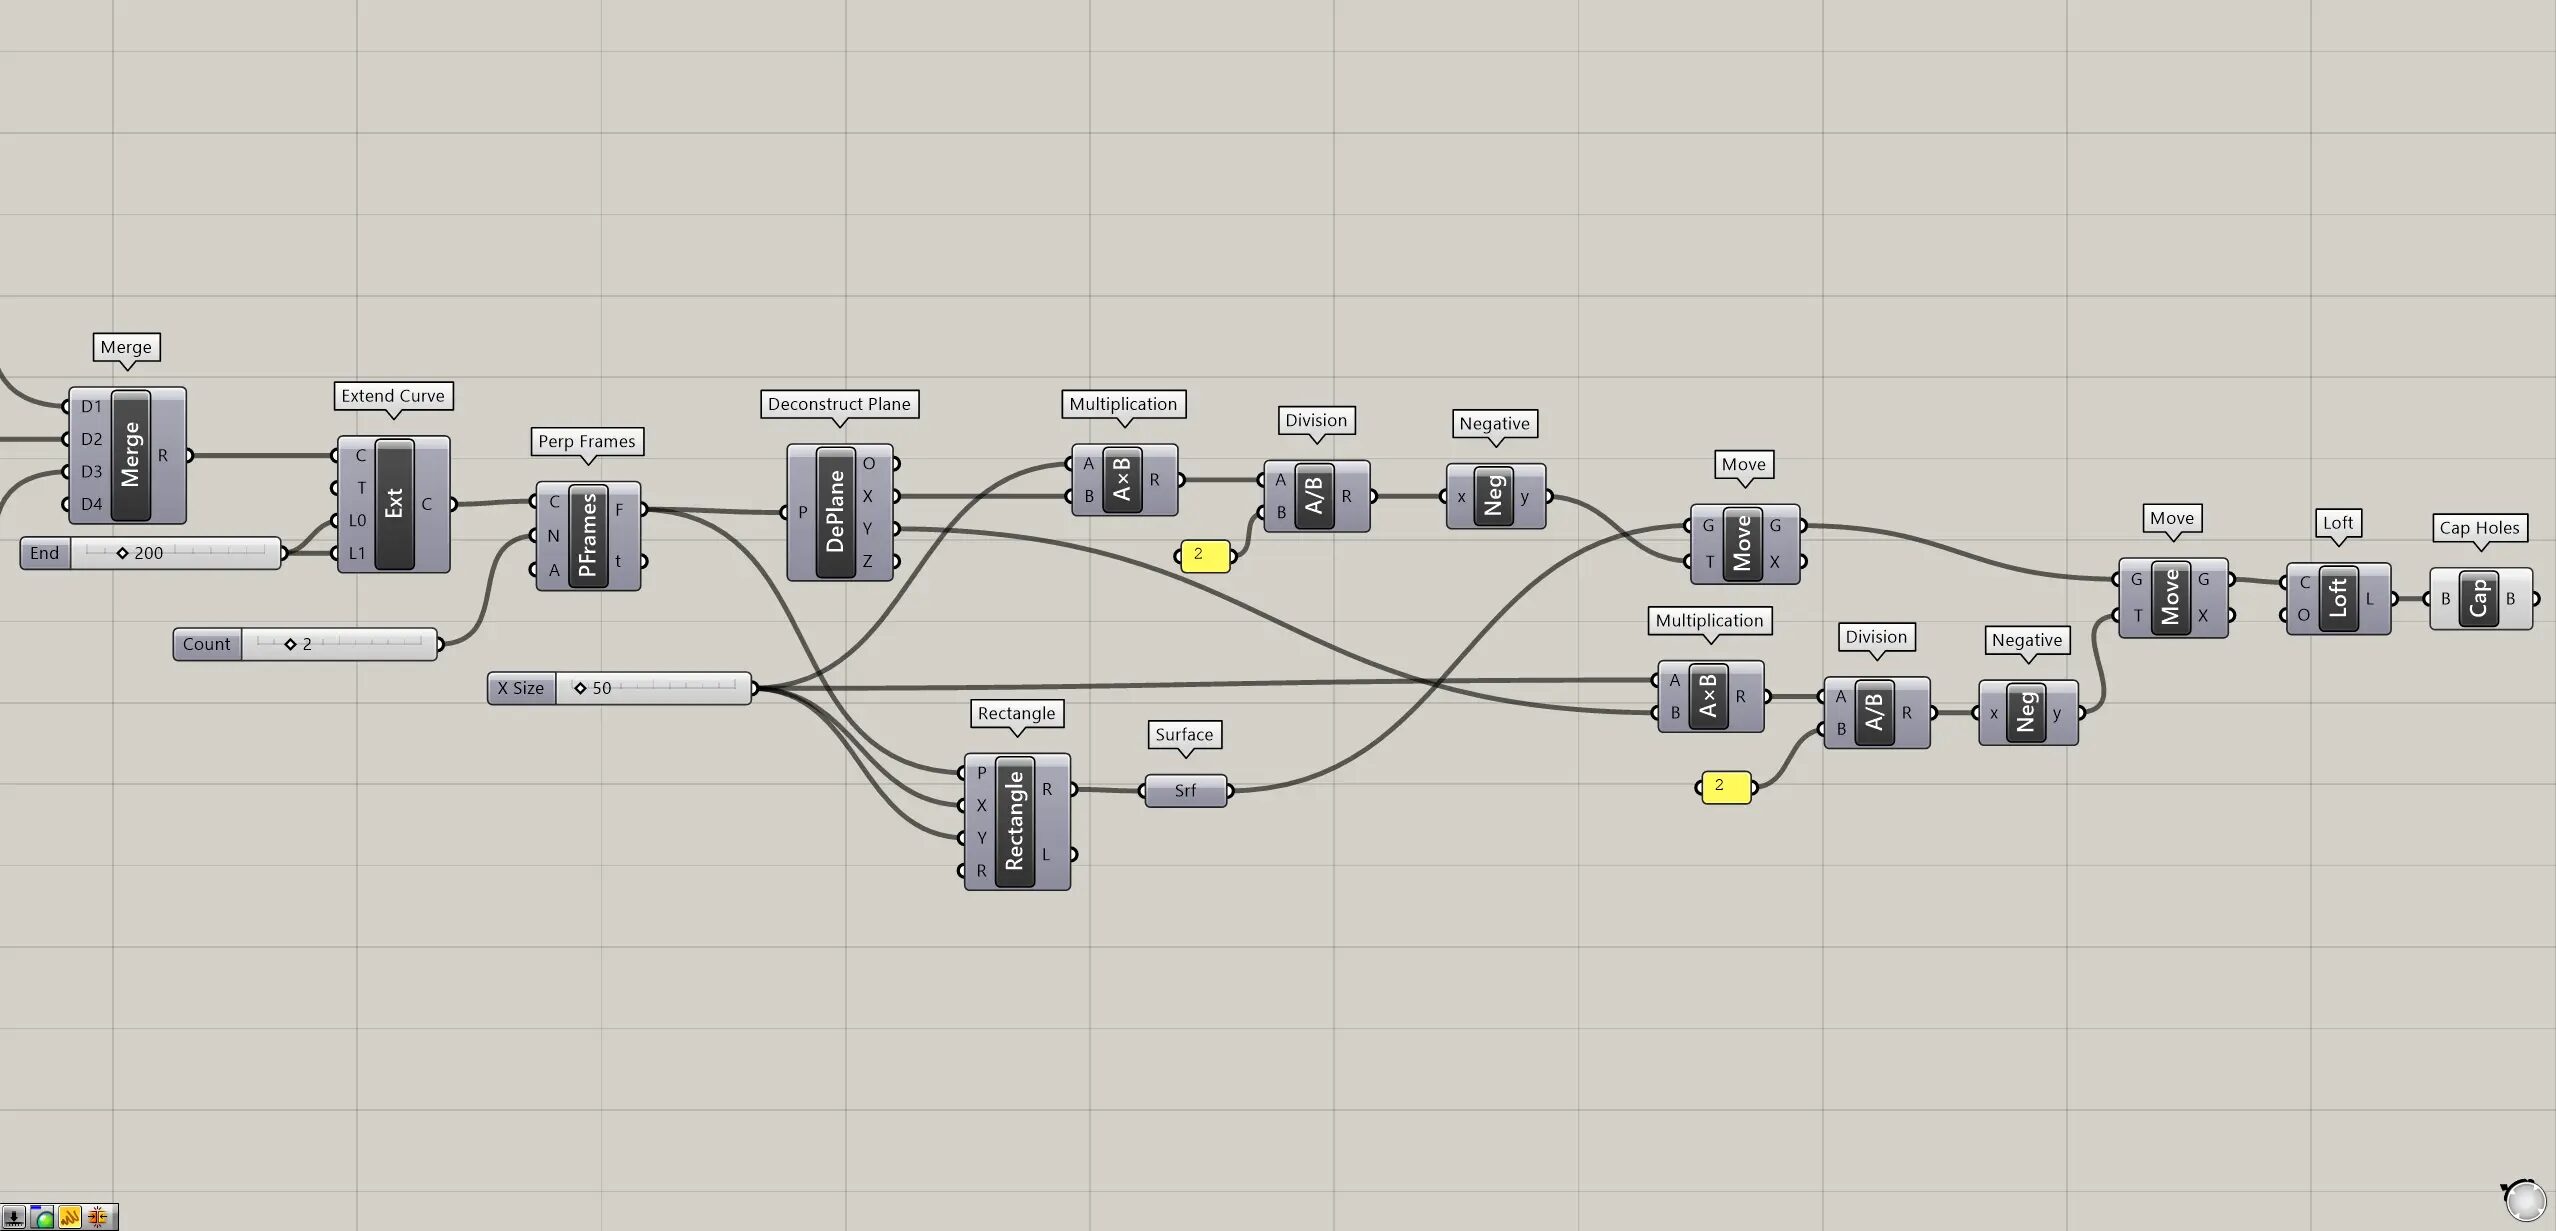
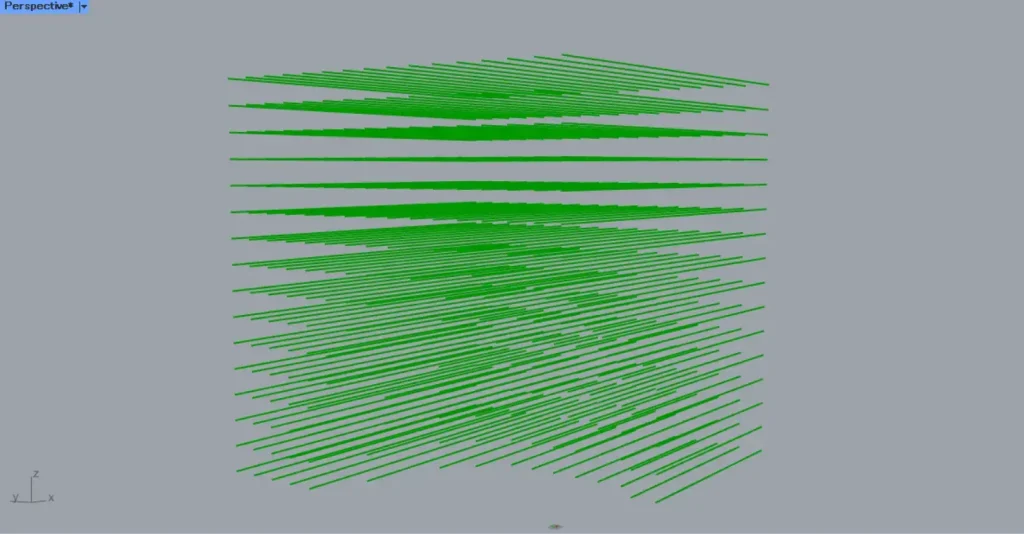
その後、Mergeを、Extend CurveのC端子につなげます。
そして、Extend CurveのL0とL1端子に、延長する線の長さの数値を入力します。
今回は、200をどちらにも入力しています。
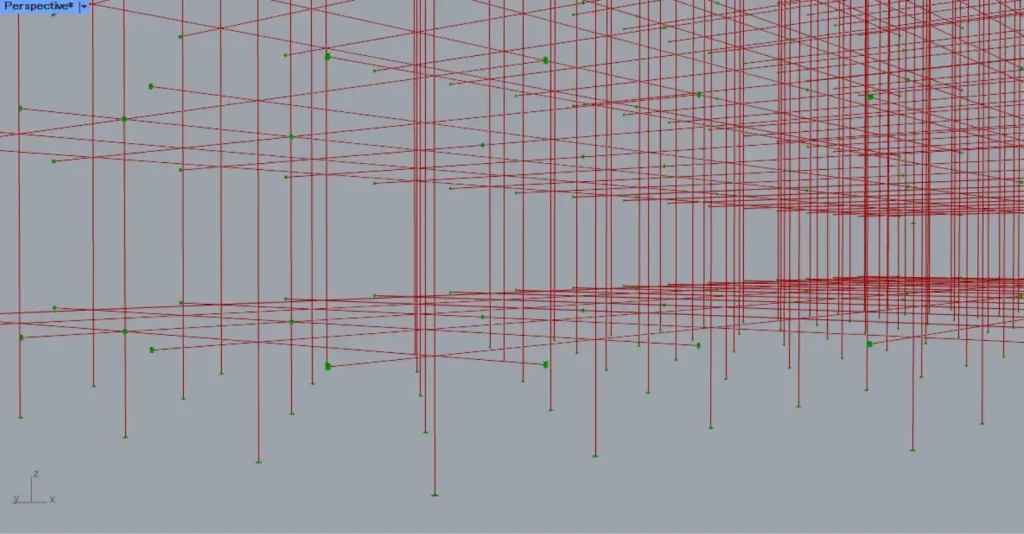
すると、上の画像のように、線を延長することができました。
その後、Extend Curveを、Perp FramesのC端子につなげます。
そして、Perp FramesのN端子に、2の数値を入力します。
すると、上の画像のように、1つの線の両端に作業平面が作成されました。

その後、Perp FramesのF端子を、RectangleのP端子につなげます。
そして、RectangleのXとY端子に、1辺の長さの数値を入力します。
今回は、どちらにも50を入力しています。
すると、線の両端に、四角形の線データが作成されました。
また、RectangleのR端子を、Surfaceにつなげます。
これにより、サーフェスの正方形が作成されました。
しかし、この状態では線の中心から、正方形の中心が外れています。
そのため、正方形のサーフェスを移動させる必要があります。
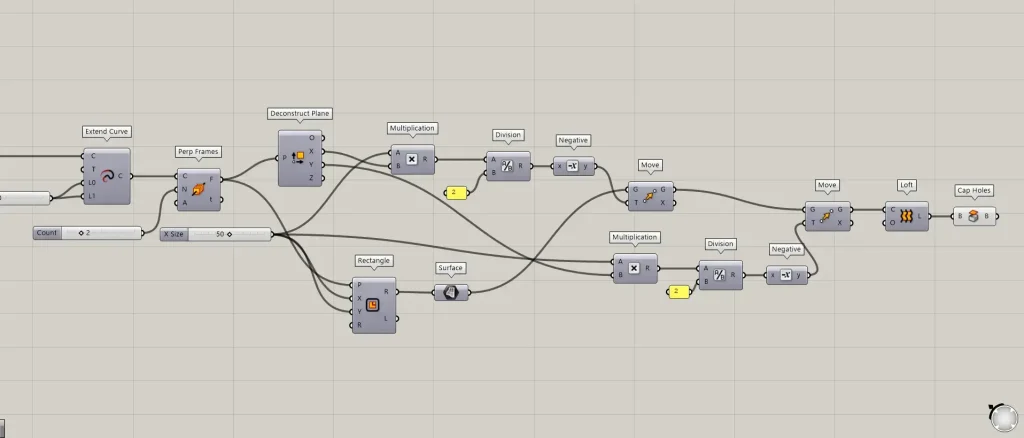
Perp FramesのF端子を、Deconstruct Planeにつなげます。
すると、各作業平面のデータを取得できます。
その後、Deconstruct PlaneのX端子と先程の50の数値を、Multiplicationにつなげます。
その後、Multiplicationを、DivisionのA端子につなげます。
また、DivisionのB端子には、数値の2を入力します。
また、Deconstruct PlaneのY端子でも、同様の作業を行います。
そして、先程のMoveを、新たなMoveのG端子につなげます。
すると、上の画像のように、線の中心に正方形のサーフェスの中心が来るようになりました。
すると、上の画像のように、2つのサーフェスをつなぎ、木材ができました。
最後に、LoftをCap Holesにつなげて、木材部分を閉じます。
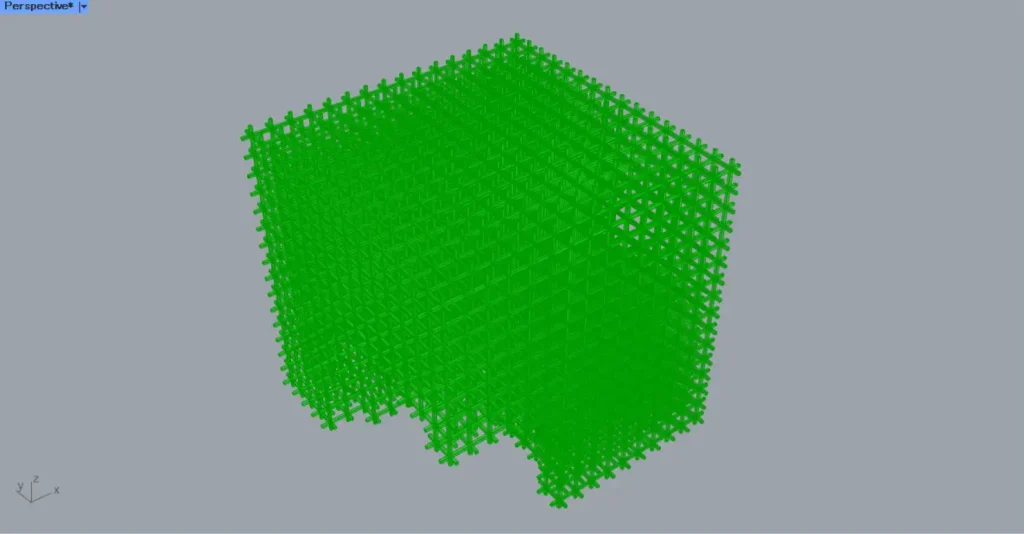
これで完成です。
今回は以上になります。


Comment